

You’re mid-job, everything’s going smoothly, and then it happens. A staple bends back on itself, a screw strips before it’s flush, or your nail gun jams and won’t budge. These moments don’t just slow you down — they eat into your materials, your time, and your patience. Whether you’re a tradie on a busy site or a DIY enthusiast in the shed, fastening failures are frustrating precisely because they’re so avoidable. This guide walks you through a clear, systematic approach to diagnosing and fixing the most common fastening problems with screws, nails, and staples, so you can get back on track fast and finish the job right.
Table of Contents
- Identifying common fastening problems
- Gathering your troubleshooting essentials
- Step-by-step: How to troubleshoot screws, nails and staples
- Avoiding the most common mistakes
- Checking your fix: Verifying quality and safety
- Where to buy trusted fasteners and tools
- Frequently asked questions
Key Takeaways
| Point | Details |
|---|---|
| Diagnose before fixing | Identify the exact fastening issue to avoid wasted effort and get a lasting repair. |
| Right tools matter | Prepare your toolkit with the right fasteners and basic maintenance items for effective troubleshooting. |
| Prevention saves time | Regular tool care, using correct settings, and matching fasteners prevent most common issues. |
| Always verify repairs | Check your result for strength and appearance before finishing the job. |
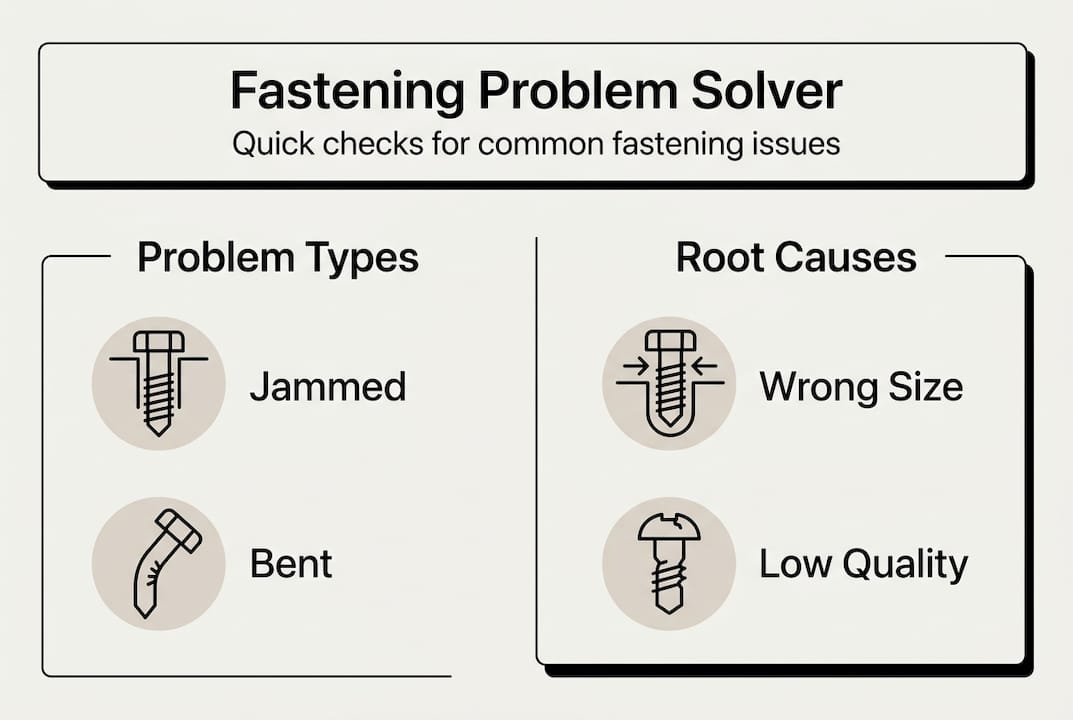
Identifying common fastening problems
Before you can fix anything, you need to know exactly what you’re dealing with. Misreading the symptom leads to the wrong fix, which wastes even more time. The good news is that most fastening failures follow recognisable patterns once you know what to look for.
Here are the most common symptoms by fastener type:
- Staples: Bending on entry, jamming inside the tool, not penetrating the surface, or firing at an angle
- Nails: Mushroomed heads, nails backing out after driving, splitting the timber, or misfiring from the gun
- Screws: Stripping the head, not driving flush, snapping under torque, or spinning without biting
When it comes to resolving fastening issues, the root cause is almost always one of four things: the wrong fastener for the material, a poorly maintained tool, incorrect settings, or operator technique. Understanding which category your problem falls into is the first step.
| Fastener type | Common problem | Likely cause |
|---|---|---|
| Staple | Bending or jamming | Wrong size, low PSI, poor lubrication |
| Staple | Not penetrating | Material too hard, insufficient pressure |
| Nail | Backing out | Wrong nail length, soft timber, angle issues |
| Nail | Mushroomed head | Incorrect hammer force or gun pressure |
| Screw | Stripping | Wrong bit, dull driver, no pilot hole |
| Screw | Not driving flush | Material density, incorrect torque setting |
As bending and jamming research confirms, staple gun problems typically stem from using the wrong size or quality of staples, driving into material that’s too hard, incorrect tool angle or pressure, jams left uncleared, low lubrication, wrong PSI on pneumatic tools, or poor maintenance habits. Recognising these patterns early saves you from compounding the problem.
If you’re working with staples specifically, reviewing the specs for troubleshooting staples can help you confirm whether your current staple size is appropriate for the job.
Know when to stop and troubleshoot rather than pushing through. If a fastener fails twice in a row in the same spot, that’s your signal to pause and investigate rather than fire again.
Gathering your troubleshooting essentials
Once you’ve spotted the problem, having the right gear by your side is the next step. Scrambling around for tools mid-fix is how small problems become big ones.
Here’s what you should have on hand before you start:
- Safety glasses (always, before anything else)
- Pliers for extracting bent or jammed fasteners
- A quality screwdriver set with multiple bit sizes
- Pneumatic tool oil or general lubricant
- Replacement fasteners in the correct size and material
- A pressure gauge if you’re working with pneumatic tools
| Fastener or tool | What it fixes | Extra items needed |
|---|---|---|
| Pneumatic stapler | Jams, misfires, depth issues | Tool oil, correct PSI gauge |
| Nail gun | Misfires, depth, angle problems | Correct nail gauge, lubricant |
| Manual screwdriver | Stripping, not driving flush | Correct bit, pilot drill bit |
| Hammer | Mushroomed heads, bent nails | Nail punch, replacement nails |
As staple maintenance guidance highlights, staple issues are often tool-related rather than fastener-related. Maintaining lubrication, using the correct PSI, clearing jams immediately, and matching staples to material hardness are the four habits that prevent most problems before they start. For pneumatic tools specifically, checking out maintenance tips for pneumatic staplers gives you a solid baseline for keeping your gear in top shape.
Pro Tip: Label a small zip-lock bag or container in your toolbox as your “fastening fix kit” and keep it stocked with spare bits, a mini lubricant bottle, and a handful of common fastener sizes. You’ll thank yourself on a busy day.
Matching fastener size and hardness to your material isn’t optional. It’s the single most important variable in preventing failures before they happen.
Step-by-step: How to troubleshoot screws, nails and staples
With your kit assembled, you’re ready to systematically eliminate the root cause. Work through each fastener type methodically rather than guessing.
For screws:
- Inspect the driver bit for wear. A rounded or chipped bit is the number one cause of stripping.
- Check your pilot hole size. In dense timber or hardwood, a pilot hole that’s too small creates excessive resistance.
- Assess material density. Engineered timber and composite boards often need a slower drive speed and a sharper bit.
- Test with a fresh screw in a different spot. If it drives cleanly, the original hole or fastener was the issue.
For nails:
- Check the nail gun’s depth adjustment setting. Most guns have a dial or wheel for this.
- Assess the angle of entry. Nails driven at an angle are more likely to back out or split the timber.
- Consider wood density. Hardwoods like spotted gum or ironbark need higher driving pressure than pine.
- Listen for the firing sound. A dull thud often means insufficient pressure; a sharp crack with splitting suggests too much.
For staples:
- Inspect the magazine for jams. Clear any bent or stuck staples before reloading.
- Check your PSI setting. Pneumatic stapler problems like not penetrating, firing too deep, jamming, or double firing are almost always linked to incorrect air pressure or lack of lubrication.
- Confirm staple size and quality. Cheap or mismatched staples are a leading cause of jams and bends.
- Lubricate the tool. A few drops of pneumatic tool oil in the air inlet before each session makes a measurable difference.
According to pneumatic stapler diagnostics, the most frequent issues include not penetrating hard surfaces due to low PSI or lack of lubrication, firing too deep from excessive pressure, jamming from dirty or rusty staples, and double firing caused by a trigger that’s being worked too quickly.
Safety first: Always disconnect pneumatic tools from the air supply before clearing a jam or performing any maintenance. Never point a loaded tool at yourself or others while troubleshooting.
Pro Tip: For pneumatic tools, check air pressure and add a drop of oil at the start of every session. It takes 30 seconds and prevents the majority of tool-related failures.
Avoiding the most common mistakes
Troubleshooting is only half the story. Prevention is just as important for reliable, repeatable results. Most fastening failures are caused by the same handful of avoidable errors.
Here are the top mistakes to steer clear of:
- Using the wrong fastener size or material for the substrate or application
- Skipping lubrication on pneumatic tools, which accelerates wear and causes jams
- Ignoring PSI settings and assuming the default pressure works for every material
- Forcing the tool when it’s jammed instead of stopping to clear and inspect
- Not clearing your workspace of debris, which can interfere with tool operation and fastener placement
- Reusing bent or damaged fasteners because it seems quicker than replacing them
As staple tool research consistently shows, the majority of staple gun failures come down to maintenance neglect and mismatched materials. These are entirely preventable with a small investment of time and attention.
Remember: Never force a fastener or fire a jammed tool. Always stop to clear and inspect before continuing. Forcing a jammed tool risks damaging the mechanism, bending more fasteners, and creating a safety hazard.
The maths here is simple. Spending 60 seconds to clear a jam properly saves you from 30 minutes of rework, wasted materials, and the frustration of a job that doesn’t hold. For broader fastening tips for building projects, the same principle applies across all fastener types: slow down to speed up.
Checking your fix: Verifying quality and safety
After careful troubleshooting and avoiding pitfalls, it’s smart to verify results before packing up. A fix that looks right on the surface can still hide problems that show up later.
Follow these steps to confirm your work is solid:
- Visual check: Confirm every fastener is flush with the surface and not proud or recessed beyond spec. Look for any cracking, splitting, or surface damage around the fastener.
- Tactile check: Run your hand over the fastened area. Any movement, wobble, or raised edges signals an incomplete fix.
- Stress test: Apply moderate pressure or load to the fastened joint. It should hold firm without any give or creaking.
- Reassemble the area: If you removed panels, trim, or components to access the fastening point, refit them and check alignment.
- Observe for recurring faults: Check back after a short period of use. If the same fastener backs out or bends again, the root cause hasn’t been fully resolved.
If the problem recurs, go back to the diagnostic stage. Consider whether the staple quality assessment points to a fastener spec issue, or whether the tool itself needs servicing. Sometimes the answer is simply upgrading to a higher-quality fastener that’s correctly rated for the material and load.
As bending and jamming analysis reinforces, recurring issues almost always trace back to wrong size or quality staples, material hardness mismatches, or maintenance gaps. Addressing all three at once gives you the most reliable outcome.
Where to buy trusted fasteners and tools
Ready to make your fix permanent with top-quality gear? At Aussie Nails and Fasteners Warehouse, we stock everything you need to get the job done right the first time.
Whether you’re a tradie needing bulk staples for a big upholstery run or a DIY enthusiast after the right screws for a weekend build, we’ve got you covered. You can shop staples online across a full range of sizes and materials, find screws for any project with confidence, or browse our range of quality fastening tools including pneumatic staplers and nail guns from trusted brands like JITOOL, APlus, and Supco. We’re Australian-owned, we understand local conditions and compliance requirements, and we offer fast delivery across Australia. When the job matters, the fasteners matter too.
Frequently asked questions
Why does my staple gun keep jamming or bending staples?
Most jams or bent staples come from using the wrong size or quality of staples, incorrect tool angle, or insufficient maintenance. Staple gun failures are also commonly linked to low PSI on pneumatic tools and inadequate lubrication.
How do I prevent my nail gun from misfiring?
Check for jams, confirm you’re using the correct PSI for the material, and clean and lubricate your tool regularly. Pneumatic misfiring is most often caused by dirty internals or incorrect air pressure settings.
What causes screws to strip or not drive fully?
Usually it’s a worn or incorrect driver bit, a pilot hole that’s too small, or driving into dense material without adjusting torque. Switching to a fresh, correctly sized bit resolves most stripping issues immediately.
When should I replace my fasteners instead of troubleshooting?
If fasteners are bent, rusted, or clearly mismatched to the material, replacement is the right call. Trying to reuse damaged fasteners rarely saves time and often creates new problems.
Can improper air pressure damage pneumatic staplers?
Yes. Incorrect PSI causes under or overdriving, increases the risk of jams, and accelerates internal wear on the tool over time.
Recommended
- CORRUGATED FASTENERS Electro Galvanised 10MM – Aussie Nails and Fasteners Warehouse
- CORRUGATED FASTENERS Electro Galvanised 13MM – Aussie Nails and Fasteners Warehouse
- Aussie Nails and Fasteners Warehouse
- Bugle Batten Screw – 500PB 14G X 75mm Galvanised – Aussie Nails and Fasteners Warehouse
- How to repair concrete cracks: Cost-effective solutions