

TL;DR:
- Selecting the right fasteners and techniques ensures material security and safety.
- Proper preparation, marking out, pre-drilling, and post-installation checks prevent failures.
- Using Australian standards-compliant fasteners suited to materials and exposure conditions is essential.
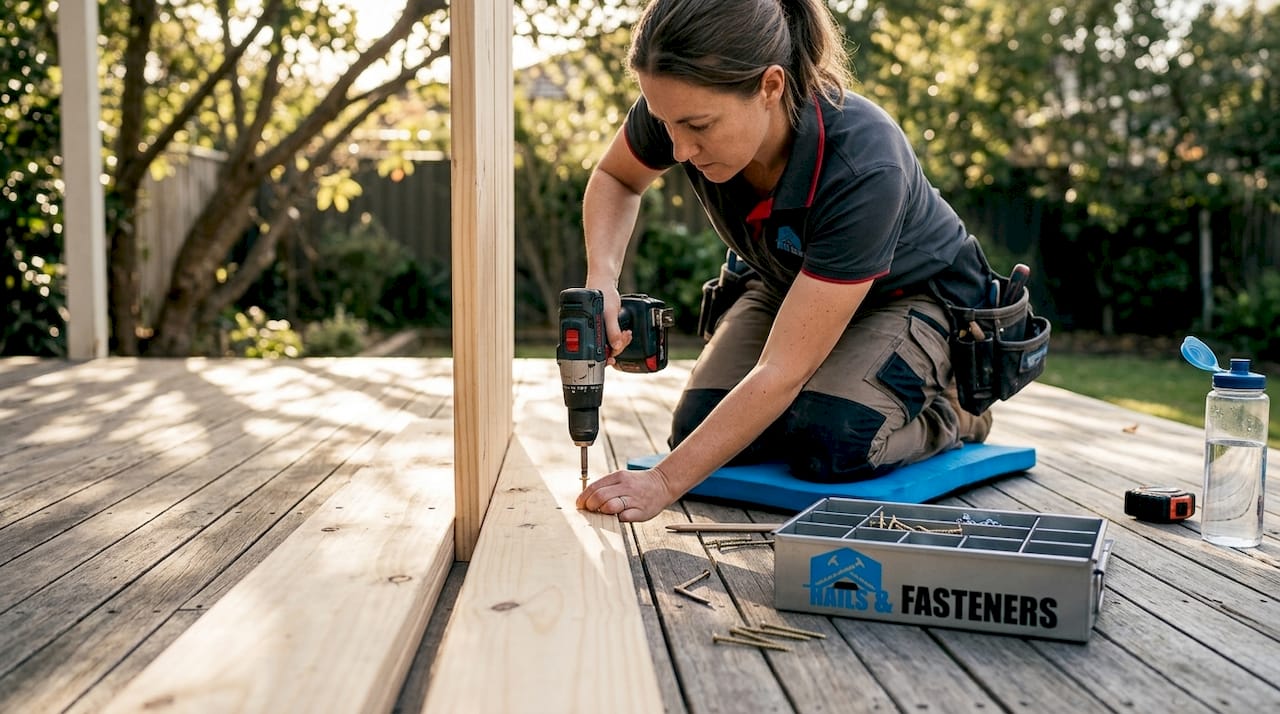
Loose decking boards that creak with every step. A fence panel that wobbles in the wind. Shelving that pulls away from the wall under load. These are not just annoyances. They are the direct result of using the wrong fastener, the wrong technique, or both. For Australian construction professionals and serious DIYers, poor material security is a productivity killer, a budget blowout, and in some cases, a genuine safety risk. This guide walks you through the complete process of selecting, installing, and verifying fasteners, so you get it right the first time and avoid costly rework.
Table of Contents
- What you need before you start
- Step by step: How to choose the right fasteners
- Step by step: The fastening process for secure results
- Troubleshooting and common mistakes
- Confirming your materials are properly secured
- Why experience beats shortcuts in securing materials
- Get the right fasteners and tools for your next project
- Frequently asked questions
Key Takeaways
| Point | Details |
|---|---|
| Prep your materials | Start with the right tools, safety gear, and fastener selection for the materials at hand. |
| Choose the best fastener | Match screws, nails, or bolts to material type and use cases for secure, lasting results. |
| Follow each install step | Use proper sequence and technique to maximise strength and safety. |
| Check and verify security | Always inspect joints and hardware after installation to catch errors early. |
| Quality matters | Top-quality Australian-standard fasteners and careful work save time and money on rework. |
What you need before you start
Good preparation separates a clean, professional result from a frustrating afternoon of redoing work. Before you touch a single fastener, gather the right tools, know your materials, and set up a safe workspace. Skipping this stage is where most mistakes begin.
Tools and materials checklist
You will need the following to cover most securing tasks:
- Cordless drill and driver bits (Phillips, square drive, hex)
- Hammer and nail punch
- Measuring tape and combination square
- Pencil or marking scribe
- Spirit level
- Safety glasses and work gloves
- Hearing protection (for pneumatic tools)
- Fastener pack sorted by material and application
Essential fastener types vary significantly across project types, which is why having a pre-sorted fastener kit saves time and reduces errors on site. Always read the labels on fastener packs before opening them. Look for compliance markings that align with Australian standards, particularly for structural applications.
Fastener compatibility at a glance
The table below outlines the most common fastener types, their key properties, and what materials they suit best.
| Fastener type | Key property | Best suited for |
|---|---|---|
| Wood screw | High pull-out resistance | Timber framing, decking, joinery |
| Masonry nail | Hardened steel shank | Concrete, brick, blockwork |
| Roofing screw | Sealing washer | Metal roofing, Colorbond, corrugated iron |
| Self-drilling screw | No pre-drill needed | Steel studs, thin sheet metal |
| Coach bolt | Heavy-duty clamping | Structural timber connections |
| Galvanised nail | Corrosion resistant | Outdoor framing, fencing |
| Specialty anchor | Load distribution | Wall-mounting into masonry |
Choosing screws or nails depends on the load type, material, and whether you need to disassemble later. Screws allow removal and adjustment; nails are faster and often stronger in shear.
Pro Tip: Always check fastener pack labels for Australian standards compliance markings, such as AS 3566 for corrosion resistance in outdoor applications. Using non-compliant fasteners in structural work can void warranties and create liability issues.
Set up your workspace before you begin. Keep fasteners sorted in labelled containers, ensure adequate lighting, and clear the area of trip hazards. A clutter-free site directly reduces mistakes.
Step by step: How to choose the right fasteners
With your kit and workspace set, the next step is picking the right fasteners for the materials you are working with. Secure fastening tips consistently point to one core problem: selecting the wrong fastener reduces both strength and durability, often leading to failure at the worst possible moment.
Decision checklist for fastener selection
Work through these steps before ordering or reaching for a fastener:
- Identify your base material. Is it softwood, hardwood, engineered timber, steel, masonry, or a composite? Each behaves differently under load and responds differently to fastener types.
- Determine the load direction. Is the load shear (lateral), withdrawal (pull-out), or combined? Nails resist shear well; screws resist withdrawal better.
- Assess exposure conditions. Indoor, sheltered outdoor, fully exposed, or coastal? Coastal environments in Australia require A4 stainless steel or heavily hot-dip galvanised fasteners due to salt air corrosion.
- Check thickness requirements. The fastener length should be at least 2.5 times the thickness of the piece being fixed. For example, fixing 19 mm timber boards requires a minimum 50 mm fastener.
- Confirm diameter and gauge. Heavier gauge screws carry more load but require pre-drilling in hardwood to prevent splitting.
- Check for dissimilar material reactions. Aluminium framing and standard steel fasteners create galvanic corrosion over time. Match material types or use isolating washers.
Fastener comparison: screws, nails, bolts, and specialty types
| Fastener | Strength type | Removable | Typical application |
|---|---|---|---|
| Screw | Withdrawal, shear | Yes | Decking, joinery, fit-out |
| Nail | Shear | No | Framing, cladding, flooring |
| Bolt | Tension, shear | Yes | Structural connections, hold-downs |
| Rivet | Shear (blind side) | No | Sheet metal, thin panels |
| Anchor bolt | Tensile (masonry) | Partial | Framing brackets, handrails |
| Specialty staple | Light shear | No | Insulation, housewrap, screening |
The screw selection process for timber joinery differs considerably from what you need for metal roofing. Similarly, choosing nail types for framing versus for finishing work involves very different logic around head type, shank pattern, and material coating.
Pro Tip: Use higher gauge screws in outdoor projects for increased rust resistance. In Australian coastal zones, opt for Grade 316 stainless steel as a minimum. It performs far better than standard galvanised options in salt-laden air over a five to ten year period.
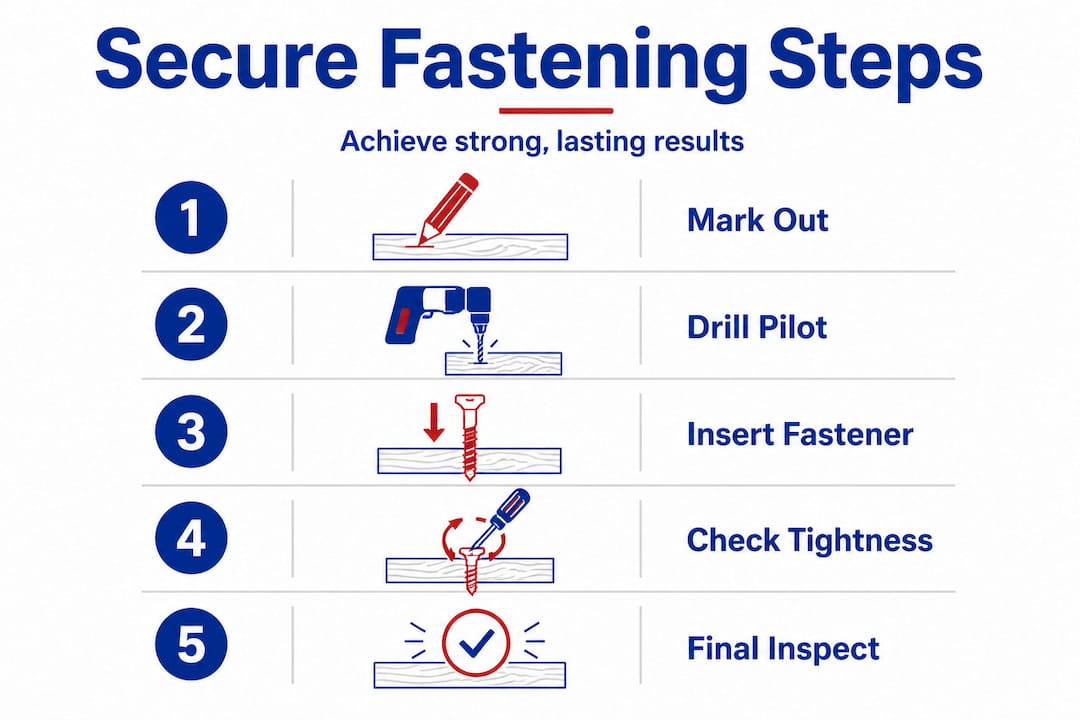
Step by step: The fastening process for secure results
Once you have chosen the right fasteners, it is crucial to follow the correct install procedure for the best outcomes. The fastener installation guide makes clear that installation sequence impacts both the durability and safety of the build. Getting the physical process right is just as important as the selection stage.
The installation sequence
Follow these steps for consistent, professional results:
- Mark out your fixing positions. Use a pencil and square to mark every fastener location before drilling. This prevents drift and ensures even spacing, which matters structurally and visually.
- Pre-drill where required. Hardwood, MDF, and composite materials all need pilot holes to prevent splitting and cracking. Match your drill bit diameter to roughly 80% of the fastener shank diameter.
- Check alignment and level. Before driving any fastener, confirm the material is positioned correctly. Moving materials after partial fixing causes unnecessary stress on the joint.
- Drive fasteners in sequence. Work from the centre outward, or from one end to the other in a consistent pattern. Random driving order can cause materials to cup, bow, or rack out of alignment.
- Set fastener depth consistently. For decking screws, the head should sit just flush or slightly below the surface. Proud heads are a trip hazard. Counter-sunk heads that go too deep weaken the connection.
- Check tightness and joint integrity. After driving, test each connection by pressing or pulling on the joined materials. Any movement indicates an issue worth addressing immediately.
For applications involving waterproofing overlays or membrane systems, understanding the waterproofing step-by-step process alongside your fastening sequence helps you plan fastener placement so it does not compromise the membrane layer.
Specific woodworking fasteners for joinery and cabinetry require additional precision because visible surfaces leave no room for error. Use a countersink bit before driving screws in any application where the head must sit below the surface.
Safety note: Always wear safety glasses when driving fasteners, particularly when using a pneumatic nail gun or impact driver. Flying debris from split timber or a misdirected nail is a leading cause of eye injuries on construction sites. Check that materials are supported properly before fixing them to prevent unexpected movement.
Pro Tip: Apply consistent, steady pressure when driving screws and avoid overtightening. Overtightening strips threads in timber, fractures composite boards, and can crack masonry. The fastener is fully set when resistance increases noticeably and the head reaches the correct depth.
Troubleshooting and common mistakes
Even with careful prep and technique, mistakes can happen. Here is how you can avoid and fix them. Specialty fastenings documentation consistently confirms that choosing the wrong fastener or improper installation are leading causes of build failure. Knowing what to look for keeps your project on track.
Common mistakes and quick fixes
- Overtightening screws: Strips the thread in timber or pulls through sheet material. Fix by backing out the screw, inserting a timber plug or filler, allowing it to cure, and re-driving into the repaired section.
- Skipping pilot holes: Leads to split timber, especially in hardwood or near board ends. Fix by removing the fastener, drilling the correct pilot hole, and re-fastening with a fresh screw.
- Using the wrong fastener for the material: For example, using a standard zinc-plated screw in treated pine causes rapid corrosion because the treatment chemicals react with the coating. Always use hot-dip galvanised or stainless fasteners with treated timber.
- Mixing incompatible metals: Aluminium framing with steel fasteners is a classic galvanic corrosion pair. Use stainless or aluminium fasteners in these applications.
- Misaligned pre-drilled holes: If the pilot hole drifts, the fastener follows it. Re-mark and re-drill rather than forcing the fastener to correct the angle.
- Inadequate fastener length: Short fasteners reduce pull-out strength significantly. Remove and replace with a correctly sized fastener. Do not simply add more short fasteners.
For projects that also involve surface treatments, reviewing guidance on preparing for waterproofing helps you understand how fastener placement, material choice, and substrate preparation all interact.
Reviewing your home improvement fasteners workflow before starting a project helps you spot these potential pitfalls before they cost you time and materials.
Pro Tip: Always double-check manufacturer specifications before installation, particularly for structural or load-bearing connections. Specifications define minimum embedment depths, edge distances, and fastener spacing that directly affect structural performance.
Confirming your materials are properly secured
After installation and troubleshooting, make sure your materials are secured for the long term with these verification steps. A quick but systematic check at the end of every job is one of the most important habits you can build. Final checks can catch over 70% of mistakes before they become structural failures.
Verification checklist
Use this checklist once all fasteners are installed:
- Visual inspection: Scan every fastener head. Look for any that are proud, cross-threaded, or sitting at an angle.
- Physical load test: Apply hand pressure in the direction the connection will be loaded. Decking boards should not flex or lift. Wall brackets should not rotate or shift.
- Listen for movement: Any creaking or clicking under load indicates a loose or insufficiently embedded fastener.
- Torque check on bolted connections: Use a torque wrench to confirm that structural bolts are tightened to the manufacturer’s specified torque rating. Hand tightening alone is rarely sufficient.
- Edge and end distance check: Confirm that no fastener is closer than the minimum edge or end distance specified for the material, which prevents splitting under load.
- Corrosion spot check: On any outdoor installation, confirm that all fasteners are the correct specification for the exposure class. A fastener that looks right but is not the correct grade will fail within a few seasons.
For metal fastening solutions in particular, verification is critical because under-torqued bolts in steel connections can loosen through vibration over time. A second check after a week of service is worth the effort on high-load connections. Similarly, guidance on waterproofing verification tips reinforces the principle that post-installation checking is a non-negotiable step in any building process.
Statistical callout: Research into construction failure modes shows that systematic post-installation checks catch the majority of installation errors before they progress to structural problems. Making verification a formal part of your workflow, not an afterthought, pays dividends in safety and longevity.
Why experience beats shortcuts in securing materials
There is a temptation in every project to move quickly. Materials are sitting ready, the weather is holding, and skipping a few steps feels harmless in the moment. But the experienced tradesperson knows exactly why that thinking is dangerous. Having covered all the steps and checks above, it is worth being direct about what separates a professional result from an amateur one.
The difference is almost never about talent or access to expensive tools. It is about respecting the sequence. Seasoned builders check alignment before every fastener. They confirm specification before opening a pack. They do a full visual sweep before calling a job done. That discipline looks slow from the outside but it eliminates rework, which is always slower and more expensive than getting it right the first time.
Newer DIYers often skip the marking out stage because it feels unnecessary. They skip pilot holes because the drill is already loaded. They skip the final check because the job looks fine. And then three months later, the decking board lifts, the bracket pulls out of the wall, or the joint opens up. The problem was always present from installation day. The final check just would have caught it.
Our view, built from working with construction professionals and experienced DIYers across Australia, is that the installation expert tips that matter most are not glamorous. They are the basics done consistently and done well. Mark out properly. Select the right fastener. Pre-drill where the material demands it. Drive in sequence. Check before you pack up.
That process is not overcautious. It is professional. And it produces results that hold.
Get the right fasteners and tools for your next project
Ready to put this system into action? The right fasteners and tools make every step of this process faster, safer, and more reliable.
At Aussie Nails and Fasteners Warehouse, we stock the full range of fasteners and tools you need to work through this process properly, whether you are a tradie running a tight build schedule or a DIYer taking on your first deck. Browse our shop screws range to find the right type, size, and coating for your specific material and exposure conditions. Looking for pneumatic tools, impact drivers, or drill accessories? Our shop tools collection includes top-rated JITOOL, APlus, and Supco products built for Australian conditions. Visit Aussie Nails and Fasteners Warehouse to explore the full range of fastener supplies and get the right products delivered quickly across Australia.
Frequently asked questions
What’s the main difference between nails, screws, and bolts for securing materials?
Nails provide shear strength, screws give holding power and easy removal, while bolts offer the most strength for heavy loads. Review the screws vs nails checklist for a clear breakdown by application type.
How do I know if I’ve chosen the right fastener?
Check that the fastener matches your material type, has the correct length and gauge, and meets Australian standards for your exposure class. Guidance on essential fastener types covers the key criteria to assess before making your selection.
What are the most common mistakes in securing materials?
Typical mistakes include choosing the wrong fastener for the material, not drilling pilot holes in hardwood or near board ends, and overtightening until threads strip. Specialty fastenings documentation outlines these failure modes in detail.
What’s the best way to check if materials are secured correctly?
Inspect by checking fastener head depth, applying hand pressure in the load direction, listening for movement, and using a torque wrench on structural bolts. Following secure fastening tips at the verification stage catches most installation errors before they progress.
Do I need different fasteners for indoor and outdoor projects?
Yes. Outdoor projects require weather-resistant fasteners such as hot-dip galvanised or stainless steel grades to resist moisture and UV degradation over time. In coastal Australian environments, Grade 316 stainless is the recommended minimum, as outlined in the essential fastener types guide for Australian conditions.
Recommended
- Top construction fastening tips for secure, lasting builds – Aussie Nails and Fasteners Warehouse
- Master the workflow for home improvement fasteners – Aussie Nails and Fasteners Warehouse
- How to secure screws: pro tips for strong, lasting results – Aussie Nails and Fasteners Warehouse
- Fastener installation guide: expert tips for Australian projects – Aussie Nails and Fasteners Warehouse