

TL;DR:
- Choosing the right staple type, tool, and application sequence ensures professional results.
- Staples are suitable for speed-focused, non-structural fixings like insulation and fabric.
- Prioritize safety by selecting galvanised staples, testing settings, and following electrical precautions.
Stapling looks straightforward until you’re flat on your back under a floor joist with the wrong tool in hand, or you watch your landscape fabric lift after the first heavy rain. The difference between a frustrating redo and a clean, professional result almost always comes down to three things: choosing the right staple, selecting the right tool, and following a clear application sequence. This guide walks you through every stage of staple application, from assessing your project and selecting materials through to troubleshooting poor holds, so you get it right the first time.
Table of Contents
- Assessing the best fastening choice for your project
- Selecting the right staples and tools for Australian projects
- Step by step staple application process
- Common mistakes and troubleshooting staple application
- An expert take: What tradies and DIYers often miss about stapling
- Get high-quality staples and expert tools for your next project
- Frequently asked questions
Key Takeaways
| Point | Details |
|---|---|
| Know staple strengths | Staples are quick for non-structural fastening but not suitable for load-bearing jobs. |
| Choose safe tools | Always select insulated staple guns and use galvanised staples outdoors for Australian projects. |
| Apply methodically | Step-by-step application with proper overlap and secure stapling ensures lasting results and reduces callbacks. |
| Avoid common mistakes | Test before starting, use enough staples at stress points, and follow all recommended safety checks. |
Assessing the best fastening choice for your project
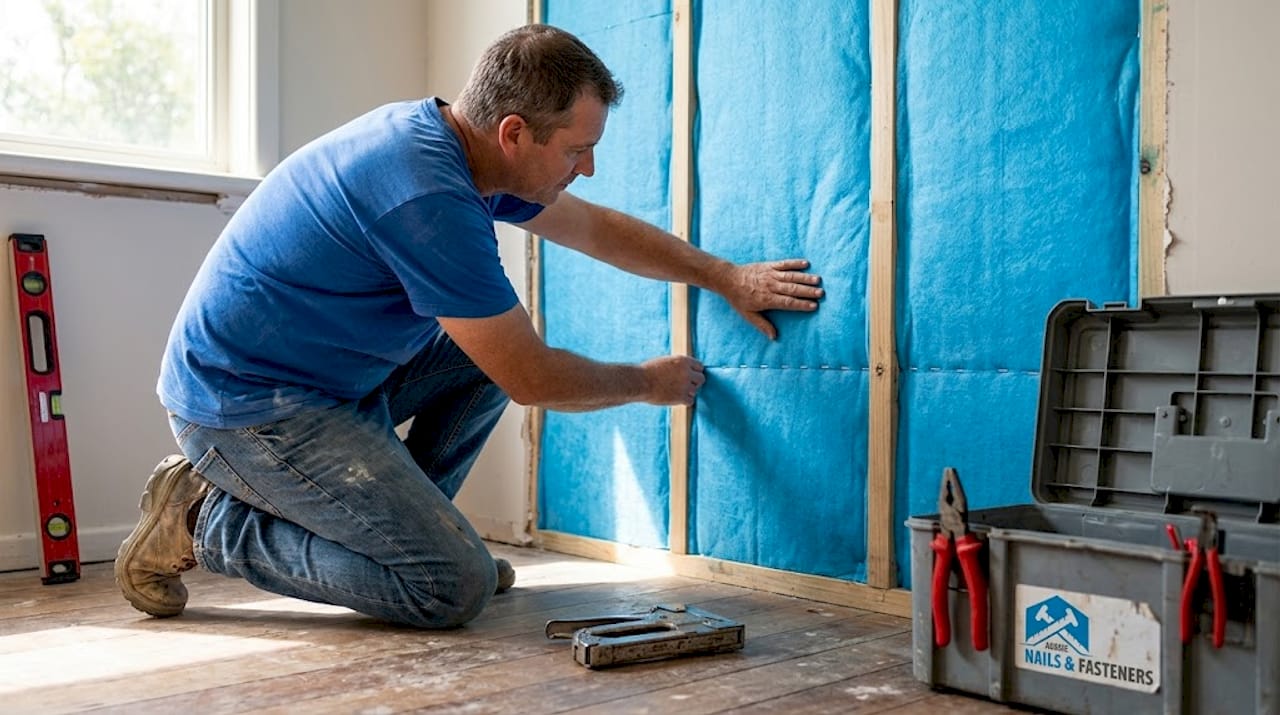
Not every job calls for a staple. Getting this decision right before you pick up a tool saves time, money, and in some cases, keeps you safe. Staples are purpose-built for speed and non-structural fixing. They shine in applications like securing insulation batts, upholstery, roofing sarking, and landscaping fabric where you need rapid, consistent fastening across a large area.
What staples are not designed for is load-bearing work. AS/NZS standards are clear that staples are not load-bearing per Australian guidelines, meaning you should never rely on them to hold structural elements under shear or tension stress. If you’re in doubt, refer to our fastening staples guide for a deeper breakdown of appropriate applications.
One detail that catches many people out is material compatibility. Polyester insulation holds better than fibreglass when stapled, because fibreglass batts tend to compress and lose grip at the staple point over time. If you’re working with fibreglass, plan for closer staple spacing and consider supplementing with adhesive at critical points.
When to choose staples over screws or nails
| Fastener | Speed | Holding strength | Best use |
|---|---|---|---|
| Staples | Very fast | Low to moderate | Insulation, fabric, sarking, landscaping |
| Nails | Moderate | High | Framing, structural timber, cladding |
| Screws | Slow | Very high | Load-bearing, joinery, decking |
A few situations where staples are clearly the right call:
- Fixing insulation batts to floor joists or wall cavities
- Securing roofing sarking and vapour barriers
- Attaching upholstery fabric or carpet underlay
- Pinning landscape fabric before mulching
Important: For outdoor applications in Australian conditions, always use galvanised staples. Bare steel will rust quickly in humidity or coastal environments, causing the staple to fail and the material to lift. Galvanised staples resist corrosion and maintain grip through wet seasons and temperature swings.
For a side-by-side breakdown of when screws or nails make more sense, our screws vs nails checklist gives you a practical decision framework you can apply on site.
Selecting the right staples and tools for Australian projects
With the decision to use staples settled, it’s time to select the right staples and tools tailored for safety and Australian conditions. This is where many DIYers and even some tradies cut corners, and it’s where things can go seriously wrong, particularly in underfloor work where live electrical cables are present.
Choosing your staple type and size
| Staple type | Length | Best application |
|---|---|---|
| T50 galvanised | 10mm | Insulation batts, hardwood framing |
| T50 galvanised | 14mm | Thicker insulation, roofing sarking |
| P Series galvanised | 19mm | Heavier materials, carpet underlay |
| U-shaped ground staples | 150-200mm | Landscape fabric, garden edging |
The 10mm galvanised T50 is the workhorse of most insulation and construction stapling jobs. A single pack typically covers around 600 to 900 staples per insulation run, so factor that into your material order before you start. Running out mid-job and having to reload or reorder breaks your workflow and can leave sections of insulation unsecured.
For landscape fabric, U-shaped ground staples are the correct choice. Drive them flush with a rubber mallet, not a steel hammer, to avoid tearing the fabric at the staple point. On slopes or sandy soils, space staples closer together than you would on flat, firm ground. Overlapping fabric edges by 150-200mm before stapling also prevents lifting at seams.
Tool selection: safety first
This is the area where we see the most dangerous mistakes. For underfloor insulation work, use double-insulated electric or battery-operated staple guns only. A metal manual staple gun in an underfloor environment with live wiring creates a real electrocution risk. Battery-operated tools remove the corded hazard entirely and give you freedom of movement in tight spaces.
If you’re using a corded electric stapler, always connect it through a portable RCD (residual current device). This is not optional. An RCD will cut power within milliseconds of a fault, which is the difference between a shock and a fatality. You can read more about tool requirements in our essential fastener types guide.
Pro Tip: For flooring transitions and trim work where stapling meets other fastening methods, reviewing a resource like installing floor edge trims helps you understand where staples hand off to other fasteners for a seamless finish.
Key safety checklist before you start:
- Confirm tool is double-insulated or battery-operated for electrical environments
- Connect corded tools through a portable RCD
- Inspect the tool for damage, jams, or worn components
- Wear safety glasses and gloves
- Keep fingers clear of the staple exit point at all times
Our fastener installation tips cover additional tool safety considerations for both pneumatic and electric fastening tools.
Step by step staple application process
Armed with the right staples and tools, let’s move on to the exact steps for professional staple application. Rushing this stage is the most common reason for poor results, so follow each step in order.
Step 1: Load your stapler safely
Always disconnect power or remove the battery before loading. Insert staples with points forward in the magazine and ensure the strip is seated flat. For hammer tackers used in roofing and insulation, quick-load mechanisms can hold up to 168 staples per load, which significantly speeds up large jobs. Reconnect power only when you’re ready to begin.
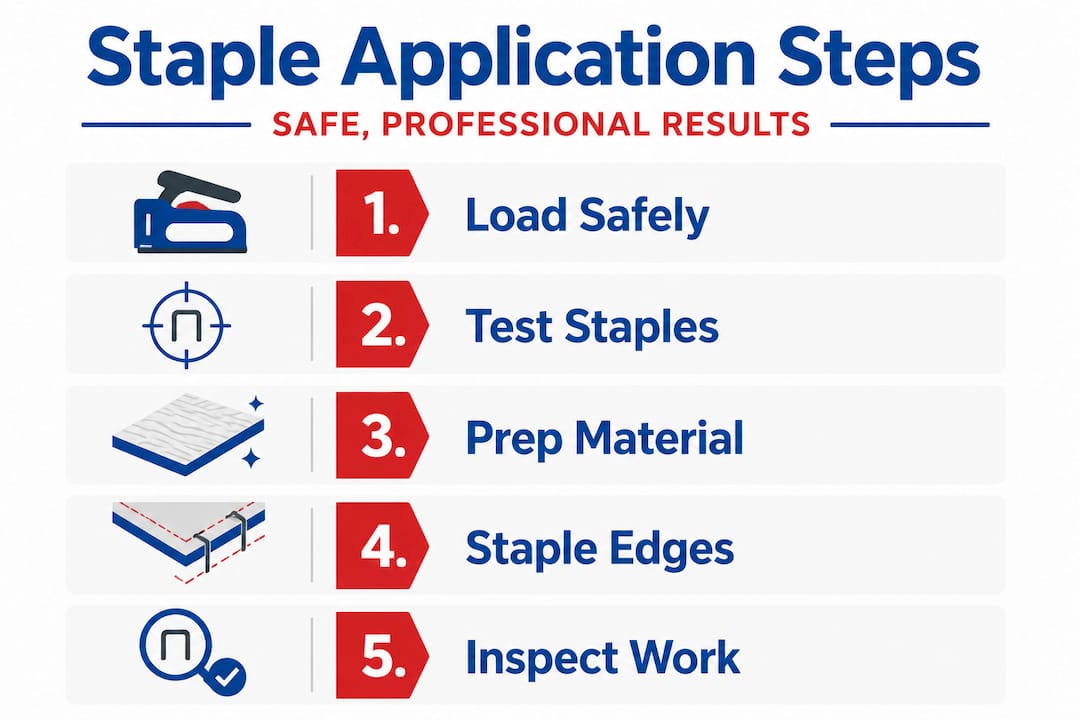
Step 2: Test on scrap material
Before touching your actual job, fire three to five staples into a scrap piece of the same material. Check that staples are sitting flush, not proud of the surface or punching through. Adjust the depth setting on your tool if needed. This 60-second test saves you from discovering a depth problem after you’ve stapled 30 metres of insulation.
Step 3: Prepare and lay your material
Lay your insulation, fabric, or sarking as flat and smooth as possible before stapling. Wrinkles and folds create weak points and gaps that undermine the material’s performance. For insulation, press the batt firmly into the cavity before fixing. For landscape fabric, pull it taut from one end before driving any staples.
Step 4: Staple edges first
Always secure the perimeter before moving to the field. Starting at edges and corners locks the material in position and prevents it from shifting as you work inward. Space edge staples every 150-200mm for most applications, or closer on stress points like corners and slopes.
Step 5: Work in a consistent sequence
Move methodically across the material. For insulation batts, run a line of staples along each long edge, then add a central row if the batt spans more than 400mm. For landscape fabric, work from one end to the other, pulling the fabric taut with each pass. Overlapping sections need a double row of staples at the seam.
Pro Tip: Always use a portable RCD with corded staplers during underfloor work, and keep the power on at the circuit only when the tool is in active use. Between sections, switch off at the board.
Step 6: Inspect your work
Once a section is complete, run your hand across the stapled surface. Every staple should be flush, with no lifted crowns or torn material around the entry point. A staple that’s proud of the surface will catch on other materials and can work loose over time. A staple that’s punched through has damaged the material and lost holding strength.
Our secure fastening tips article goes further into inspection techniques for different material types. For more unusual applications, our specialty fastenings guide covers edge cases like vapour barriers and acoustic underlays.
Common mistakes and troubleshooting staple application
Even seasoned pros face setbacks. Here are the common mistakes and how to correct them before they cost you time or materials.
The most frequent errors on Australian job sites:
- Using non-galvanised staples outdoors, leading to rust and material failure within months
- Selecting the wrong staple length, either too short to grip or so long they punch through
- Skipping the test fire and discovering depth problems mid-job
- Insufficient overlap on fabric seams, causing lifting at joins
- Ignoring electrical safety steps in underfloor environments
- Forcing a jammed staple gun without disconnecting power first
Troubleshooting poor hold
If staples are pulling out or the material is lifting, work through this checklist:
- Try a longer staple. Pros recommend 10mm galvanised for hardwoods, but if you’re in rocky or compacted soil with ground staples, pre-drilling a pilot hole before driving gives you far better penetration and hold.
- Tighten your overlap. On landscape fabric, a 150-200mm overlap stapled with a double row is far more secure than a single-stapled 50mm overlap.
- Check your depth setting. A staple driven too shallow will work loose. Too deep and it tears the material, reducing grip.
Remember: There are no universal pull-out strength benchmarks for staple sizes across all materials. What works in soft pine may not hold in hardwood, and what holds on flat ground may fail on a slope. Always test before committing to a full run.
Clearing a jammed staple gun
Disconnect power or remove the battery first, every single time. Open the magazine, remove the remaining staple strip, and use a flat-head screwdriver to clear the jammed staple from the driver channel. Never use your fingers to clear a jam in a loaded, powered tool. Reload and test on scrap before resuming.
Pro Tip: If your staple gun is jamming repeatedly, check that you’re using the correct staple series for your tool. Mismatched staples are the number one cause of chronic jams. Refer to our woodworking fasteners guide for staple compatibility information.
For flooring applications where stapling transitions to other fastening methods, a step-by-step flooring transitions guide helps you plan the handover between fastener types cleanly.
An expert take: What tradies and DIYers often miss about stapling
Let’s step back and look at this with a professional lens. After seeing hundreds of jobs go wrong at the fastening stage, the pattern is almost always the same: people underestimate the planning phase and overestimate how forgiving stapling is as a method.
The biggest blind spot we see is electrical risk in underfloor work. Tradies who’ve done dozens of insulation jobs without incident sometimes get complacent about tool selection. They grab whatever stapler is nearby, including metal manual guns, because the job “only takes twenty minutes.” That attitude is how serious incidents happen. The risk is not theoretical. Australian underfloor spaces often have aged wiring with degraded insulation, and a metal tool contacting a live conductor in a confined space is a genuine emergency.
The second pattern is rushing the material selection step. Choosing the wrong staple for the substrate, whether that’s a non-galvanised staple in a coastal environment or a too-short staple in dense material, creates a failure that won’t show up immediately. You’ll finish the job, pack up, and come back six months later to find lifted fabric, sagging insulation, or rust-stained surfaces. The fix takes twice as long as the original job.
Experienced professionals treat the planning stage as seriously as the application itself. They check material specs, confirm staple compatibility, inspect the tool, and run a test before starting. That approach adds maybe ten minutes to a job and eliminates the most common failure points entirely.
Speed is one of the genuine advantages of stapling over screws or nails. But speed should be the outcome of a well-planned process, not a shortcut through it. The tradies who get the fastest, cleanest results are the ones who slow down at the start. If you want to see how this principle applies across different metal substrates and fastening methods, our metal fastening solutions article is worth your time.
Get high-quality staples and expert tools for your next project
If you’re ready to put these tips into action, the right staples and tools make all the difference between a job that holds and one that needs redoing.
At Aussie Nails and Fasteners Warehouse, we stock staples and tools matched specifically to Australian conditions and project types. Our P Series Staples 19mm electro-galvanised staples are built for corrosion resistance and consistent holding strength across insulation, fabric, and flooring applications. For tools, browse our full range of quality staple tools including battery-operated and double-insulated options designed with Australian safety standards in mind. Our team is available to help tradies and DIYers choose the right combination for their specific job, so you get it right the first time.
Frequently asked questions
What kind of staple gun is safest for underfloor insulation?
Use a double-insulated electric or battery-operated staple gun, never a metal manual gun, to minimise the risk of electrocution in underfloor environments where live wiring may be present.
How often should I use staples on landscape fabric?
Secure edges with staples every 60-90cm, and place staples closer together on slopes or sandy soils. Double up at seams and stress points for a hold that lasts through wet weather.
What is the difference between staples and nails for construction?
Staples are faster for non-structural fastening but carry lower shear strength than nails and are not suitable for load-bearing tasks per AS/NZS standards. Nails are the correct choice where structural holding strength is required.
How do I reload staples safely?
Always disconnect power or remove the battery first, insert staples with points forward in the magazine, and test on scrap material before returning to the job.
Recommended
- Complete guide to fastening staples: construction and DIY – Aussie Nails and Fasteners Warehouse
- Master the workflow for home improvement fasteners – Aussie Nails and Fasteners Warehouse
- How to install screws for strong, secure results every time – Aussie Nails and Fasteners Warehouse
- Master the screw selection process for reliable builds – Aussie Nails and Fasteners Warehouse